Introduction
Ever wondered how often your website is visited? Or how often a specific blog post is read?
This post explains step by step how to track page visits in a SvelteKit application. We will do this manually without external analytics provider. This is a valid approach for personal websites and smaller projects. It also gives you full control over how you store and visualize the data. You could even bring back one of those 90s page view counters!
Prerequisites. Your SvelteKit application needs access to a database. The specific type of database does not matter. In my case, I use a SQLite database hosted on Turso. This post also assumes that you are familiar with standard SvelteKit concepts.
The code is available on GitHub.
Client-side approach
Before we start writing code, we should decide where to trigger the page visit.
One obvious idea is to handle the page visit inside the page server load function in +page.server.ts. While this approach seems more secure because it runs entirely on the server, it has several drawbacks:
- We would need to repeat the same logic in multiple page server load functions. Even if we extract a helper like
track_visitand calltrack_visit()in each load function, it is still duplicated code and prone to errors. It is easy to forget when creating a new page. - On pages that do not load any other data, we would still need to add a load function just for tracking.
- If you decide to track only certain pages, that decision is scattered across multiple files. There is no visible global configuration.
- Prerendered pages would not work. This is especially problematic for blog posts. For me, this was the deal breaker.
- By default, hovering over an internal link already triggers a page load in SvelteKit. That should not count as a page visit.
- We do not want to track a visit if the load function fails, whether the failure is expected or unexpected. In particular, visits of nonexistent dynamic routes (such as blog posts) should not be tracked.
Points 1 and 3 can be improved by using the handle hook and checking whether event.request.method is GET, which indicates a page visit. However, the other issues remain. The layout server load function is not a solution either because it does not run often enough.
For these reasons, we will use a client-side approach.
Tracked paths
You may not want to track every page. To control this, create an array that defines which paths should be tracked. Place it on the server, for example in $lib/server/config.ts. Use route/* to match all pages below route.
// config.ts

/**
 * List of paths whose visits will be tracked.
 */
export const TRACKED_PATHS = ['/', '/blog', '/blog/*', '/about']
We also need this array on the client. Retrieve it in the root server load function in +layout.server.ts and pass it down.
// +layout.server.ts

import { TRACKED_PATHS } from '$lib/server/config'

export const load = async () => {
	return { tracked_paths: TRACKED_PATHS }
}
If you want to track all pages, you can skip this step and ignore everything related to TRACKED_PATHS below.
Tracking on the Client
Client-side tracking is implemented in a function called track_visit inside $lib/client/track.ts. We will complete it later.
// track.ts

export async function track_visit(path: string, tracked_paths: string[]) {
	console.info('will track:', path)
	// TODO
}
Next, call this function from the root layout file +layout.svelte. The key is to use a $effect rune, which tells SvelteKit to rerun the function whenever the path changes. This is exactly the behavior we need.
<!-- +layout.svelte -->

<script lang="ts">
	// ... code from root layout ...

	let { data, children } = $props()

	$effect(() => {
		track_visit(page.url.pathname, data.tracked_paths)
	})
</script>

{@render children()}
This is much cleaner than adding tracking logic to multiple load functions. A single call in the root layout is sufficient.
Back in track_visit, first check whether the current path should be tracked. If not, return early. We also need to handle route/* patterns.
// track.ts

const trackable =
	tracked_paths.includes(path) ||
	tracked_paths.some(
		(p) => p.endsWith('*') && path.startsWith(p.substring(0, p.length - 1)),
	)

if (!trackable) return
Finally, send a request to the API endpoint /api/track, which we will implement later.
// track.ts

try {
	await fetch('/api/track', {
		method: 'POST',
		body: JSON.stringify({ path }),
		headers: { 'Content-Type': 'application/json' },
	})
} catch (err) {
	console.error(err)
}
This POST request sends the path in the request body. With that, the track_visit function is complete.
Session Management
To avoid counting multiple page views from the same user (which is just one page visit), we generate a random, anonymous session identifier per user. This identifier is stored in a session cookie and attached to event.locals.session_id for later use. The following utility in $lib/server/sessions.ts handles this:
// sessions.ts

import type { RequestEvent } from '@sveltejs/kit'
import crypto from 'node:crypto'

const SESSION_COOKIE = 'session_id'

export function handle_session(event: RequestEvent) {
	const saved_session_id = event.cookies.get(SESSION_COOKIE)

	if (saved_session_id) {
		event.locals.session_id = saved_session_id
		return
	}

	const session_id = crypto.randomUUID()

	event.cookies.set(SESSION_COOKIE, session_id, {
		path: '/',
		sameSite: true,
		httpOnly: true,
		secure: true,
	})

	event.locals.session_id = session_id
}
At this point, TypeScript will probably yell at you, but you can make it happy again by by updating the Locals type in app.d.ts:
// app.d.ts

declare global {
	namespace App {
		interface Locals {
			session_id: string
		}
	}
}
This handler should run on every server request. The best place to do this is the handle hook:
// hooks.server.ts

import { handle_session } from '$lib/server/sessions'
import type { Handle } from '@sveltejs/kit'

export const handle: Handle = async ({ event, resolve }) => {
	handle_session(event)
	return await resolve(event)
}
API endpoint
To handle the POST request from the client, create /api/track/+server.ts as our API endpoint:
import { json, type RequestHandler } from '@sveltejs/kit'

export const POST: RequestHandler = async (event) => {
	// TODO

	return json({ message: 'Page visit has been tracked successfully' })
}
First, extract the path from the request body. You should validate the body (never trust the client!), but this step is omitted here (see the GitHub source for details):
const body = await event.request.json()
const path = body.path as string
Next, check if the path is allowed to be tracked. Even though the client already checks this, the server must not trust the client. One could argue that the client-side check could be skipped, but 99.99% of users are not acting maliciously, and for them it helps avoid unnecessary network requests.
const trackable =
	TRACKED_PATHS.includes(path) ||
	TRACKED_PATHS.some(
		(p) => p.endsWith('*') && path.startsWith(p.substring(0, p.length - 1)),
	)

if (!trackable) {
	return json({ error: 'Forbidden' }, { status: 403 })
}
To deduplicate page views, we use session IDs. Outside the request handler, create an in-memory cache (use Redis in case of high traffic) to track sessions and expirations. Also include a function to clean expired entries:
// maps {session_id}:{path} to expiration time
const visits_cache: Map<string, number> = new Map()

function clean_cache() {
	const now = Date.now()
	for (const [key, expires_at] of visits_cache.entries()) {
		if (expires_at <= now) visits_cache.delete(key)
	}
}
Inside the request handler, read the session ID from the event and return early if the page has already been tracked for that session. Otherwise, save the page visit and update the cache:
clean_cache()

const cache_key = `${session_id}:${path}`
if (visits_cache.has(cache_key)) {
	return json({ message: 'Page visit has been tracked before' })
}

// TODO: save page visit to database

const expires_at = Date.now() + 1000 * 60 * 60 // 1 hour
visits_cache.set(cache_key, expires_at)

return json({ message: 'Page visit has been tracked successfully' })
For already-tracked visits, the status code remains 200. You could use 409 (Conflict), but this avoids unnecessary errors in the network tab.
Database entry
Finally, we add the page visit to the database. The details depend on your database and how detailed you want your analytics to be. In my case, I use SQLite and only track the number of visits per page per month (YYYY-MM). I don't save each visit separately; instead, I increment the counter for the current month, or set it to 1 if it's a new month.
The table structure looks like this:
-- seed.sql

CREATE TABLE IF NOT EXISTS page_visits (
    id INTEGER PRIMARY KEY,
    path TEXT NOT NULL,
    month TEXT NOT NULL,
    visits INTEGER NOT NULL DEFAULT 0,
    UNIQUE (path, month)
);
I use the database client @libsql/client from Turso:
// $lib/server/db.ts

import { DB_AUTH_TOKEN, DB_URL } from '$env/static/private'
import { createClient } from '@libsql/client'

export const db = createClient({
	url: DB_URL,
	authToken: DB_AUTH_TOKEN,
})
We also need a utility to get the current month in YYYY-MM format. It returns the first 7 characters from the ISO string.
// $lib/server/utils.ts

export function get_current_month(): string {
	const today = new Date()
	return today.toISOString().substring(0, 7)
}
Finally, insert or update the page visit in the database:
// /api/track/+server.ts

// ... request handler code ...

const month = get_current_month()

const sql = `
	INSERT INTO page_visits
		(path, month, visits)
	VALUES
		(?, ?, 1)
	ON CONFLICT (path, month)
		DO UPDATE SET visits = visits + 1`

const args = [path, month]

try {
	await db.execute(sql, args)
} catch (err) {
	console.error(err)
	return json({ error: 'Database error' }, { status: 500 })
}
This SQL statement sets the counter to 1 for a new (path, month) pair, and increments it if the pair already exists. Doing it this way with a single query is more efficient than checking first and then updating or inserting separately.
With this, all page visits are fully tracked.
By inspecting request headers, you can store more than just a visit counter. For example, the user-agent header provides information about the user's device and browser. If your app is deployed on Netlify, you can use the x-country header to determine the user's country, and the x-nf-geo header contains a base64-encoded object with more detailed location data.
// user's country
const country = event.request.headers.get('x-country')
Visualize page visits
To get an overview of page visits, create a page at /page-visits, load the data from the database in the server load function, process it, and choose any type of visualization.
This is how it may look like:
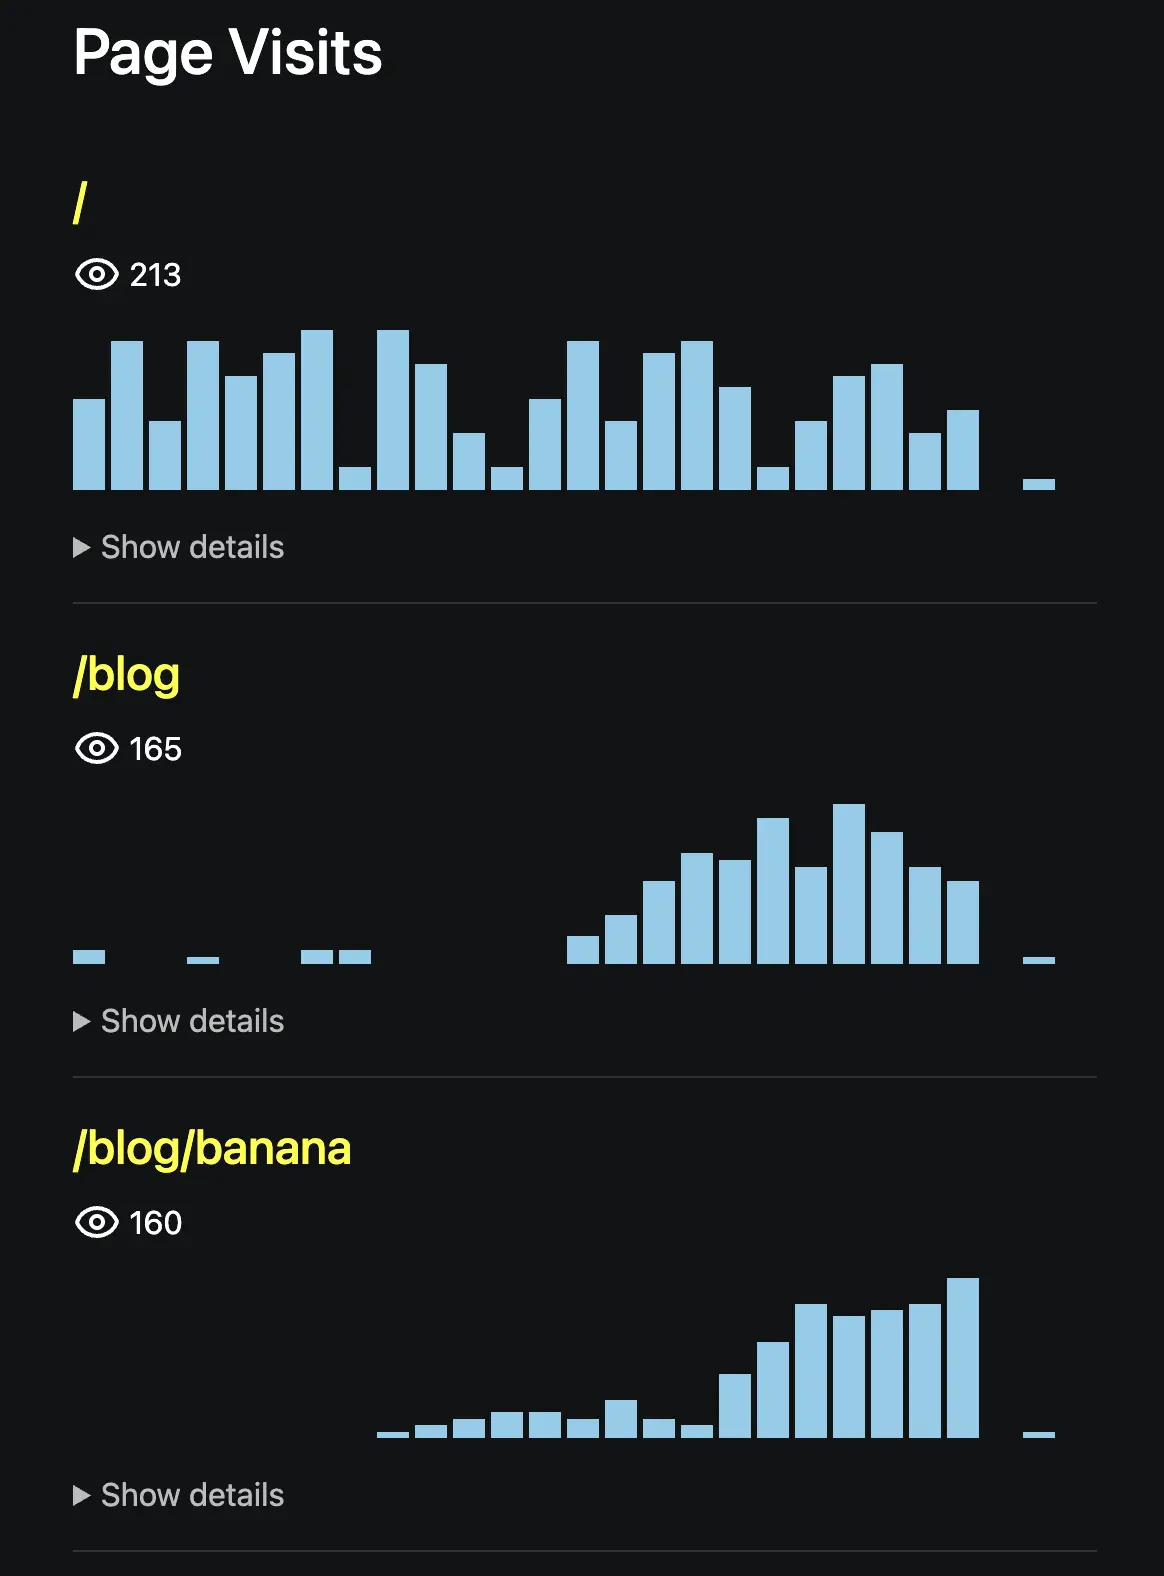
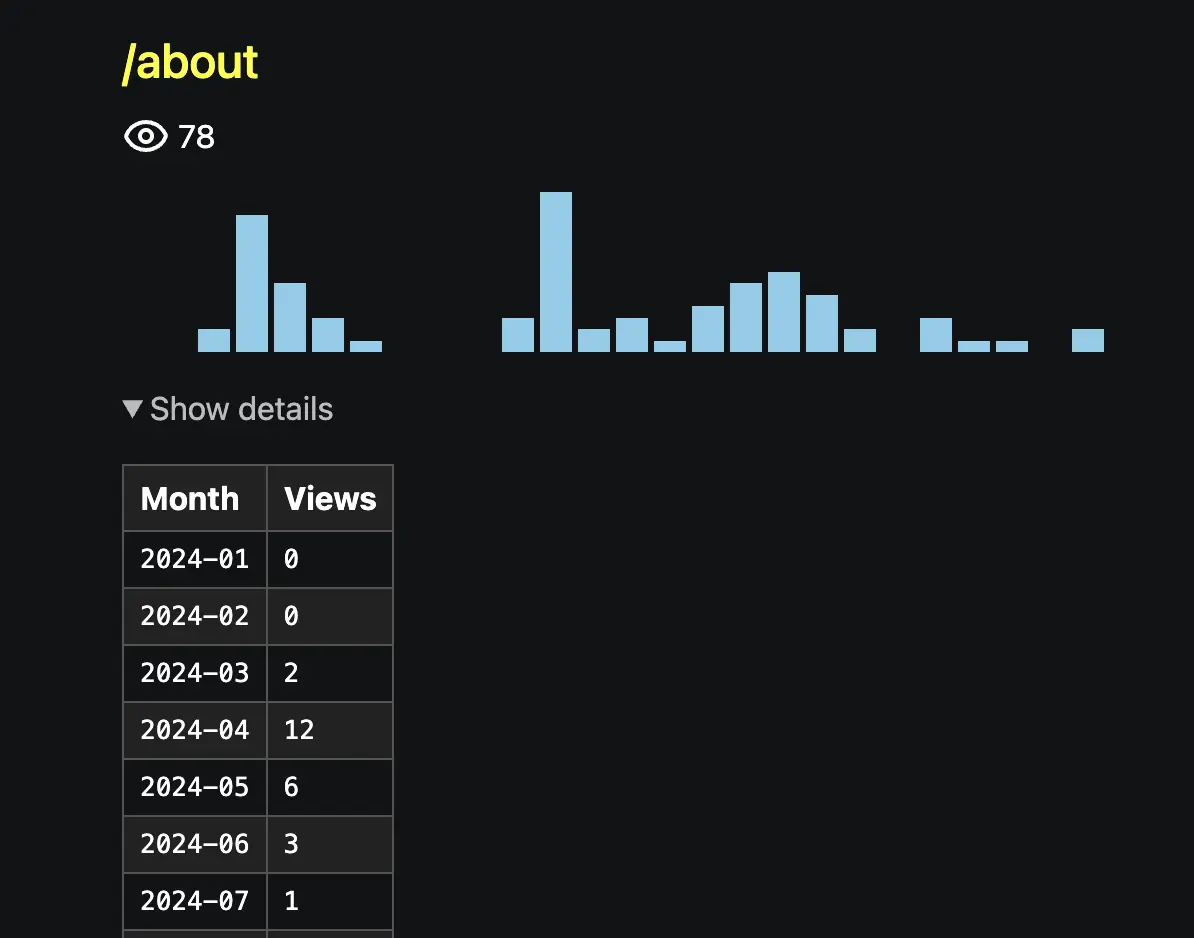
See the linked GitHub repository for details on how I did this manually. You might prefer to use a library to make the visualization look more professional.
You can also keep it simple by creating an endpoint that returns the database entries as JSON:
// routes/page-visits/+server.ts

import { json } from '@sveltejs/kit'
import type { RequestHandler } from './$types'
import { db } from '$lib/server/db'

export const GET: RequestHandler = async (event) => {
	const sql = `
        SELECT path, month, visits
        FROM page_visits
        ORDER BY path, month`

	try {
		const res = await db.execute(sql)
		return json(res.rows)
	} catch (err) {
		console.error(err)
		return json({ error: 'Database error' }, { status: 500 })
	}
}
It will return something like:
[
	{
		"path": "/",
		"month": "2024-01",
		"visits": 8
	},
	{
		"path": "/",
		"month": "2024-02",
		"visits": 13
	},
	{
		"path": "/",
		"month": "2024-03",
		"visits": 6
	}
]
You can secure the page or endpoint with authentication. For this use case, HTTP Basic Auth is probably sufficient. Dana Woodman wrote an article on adding HTTP Basic Auth in SvelteKit.
You may also prevent crawlers from accessing the page by updating robots.txt:
User-agent: *
Disallow: /page-visits
Prevent tracking your own visits
Put briefly, add a button on the page visits page that sets or toggles a notrack item in the browser's localStorage. The client-side track_visit function can then return early if this item exists:
if (window.localStorage.getItem('notrack')) return
You could also offer this option to regular visitors. There are no privacy concerns since the database only stores counters, not any personal data.
Security measures
We need to secure our API to reduce the risk of malicious usage.
First, we can verify that the API is called by our application and not from elsewhere. We do this by checking the origin and referer headers. While these headers can be spoofed, this step helps minimize the attack surface.
function is_same_origin(request: Request, site_origin: string): boolean {
	const origin = request.headers.get('origin')
	const referer = request.headers.get('referer')

	if (origin !== null) return origin === site_origin
	if (referer !== null) return referer.startsWith(site_origin)

	return false
}
The POST request handler in /api/track/+server.ts responds with 403 if the check fails:
export const POST: RequestHandler = async (event) => {
	if (!is_same_origin(event.request, event.url.origin)) {
		return json({ error: 'Forbidden' }, { status: 403 })
	}
Next, we can check the user agent to detect bots or crawlers. Install es6-crawler-detect and initialize it:
import { Crawler } from 'es6-crawler-detect'
const CrawlerDetector = new Crawler()
Then respond with 403 if a bot is detected:
const ua = event.request.headers.get('user-agent') ?? ''
if (CrawlerDetector.isCrawler(ua)) {
	return json({ error: 'Forbidden' }, { status: 403 })
}
We can also verify the content type:
const content_type = event.request.headers.get('Content-Type')
if (content_type !== 'application/json') {
	return json({ error: 'Forbidden' }, { status: 403 })
}
Optionally, you may add rate limiting if it's not already handled by an API gateway. These measures do not guarantee 100% security, but they are sufficient for this analytics API.
With a server-only approach, most of these checks would be unnecessary. However, using the client-side approach allows us to track prerendered pages as well. This very blog post is an example. One day after publishing it, it got 41 visits (from Singapore, Washington, Berlin, Los Angeles, ...).
Conclusion
Page visits in a SvelteKit application can be tracked without using third-party analytics. Using client-side tracking, session management, and a simple database setup, you can record visits and avoid counting duplicates.
This setup also allows you to visualize the data or extend it with additional metrics as needed, while keeping the implementation simple.