Introduction
How would you build a fully functional todo app for the browser? If you are coming from frameworks like React or Svelte, you might think of managing state in the browser and syncing it with a backend.
// React
const [tasks, setTasks] = useState([])

// Svelte
const tasks = $state([])
However, SvelteKit — the meta-framework built on top of Svelte — shows that you can build the same application without any client-side JavaScript. This post explains how.
The application built in this post is available at
sveltekit-crud-operations.netlify.app. The source code can be found on GitHub.
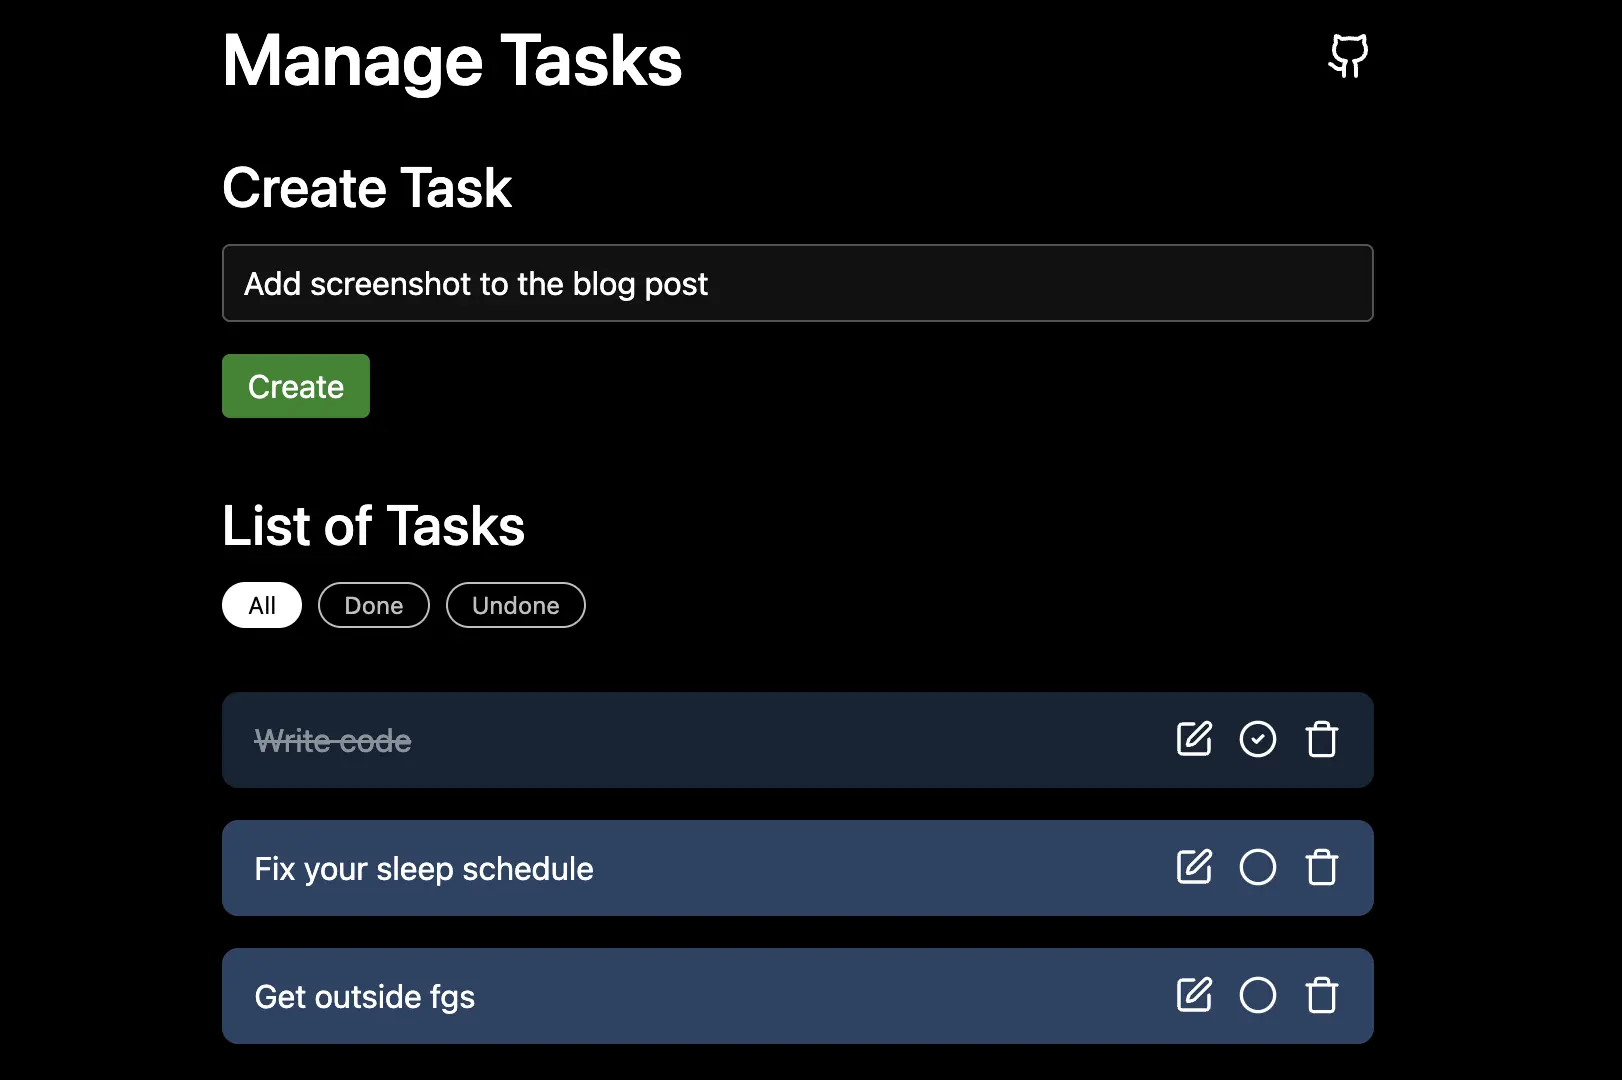
If you disable JavaScript in your browser, the application still works. A small amount of CSS is used for styling, but it is not covered here.
In general, SvelteKit's form actions send data to the server, load functions return (updated) data to the browser, and the URL can manage temporary state. Form actions allow us to create, update, and delete tasks. Load functions allow us to read tasks. Together, they provide all four CRUD operations (Create, Read, Update, Delete). The URL can additionally be used to filter tasks (all / done / undone).
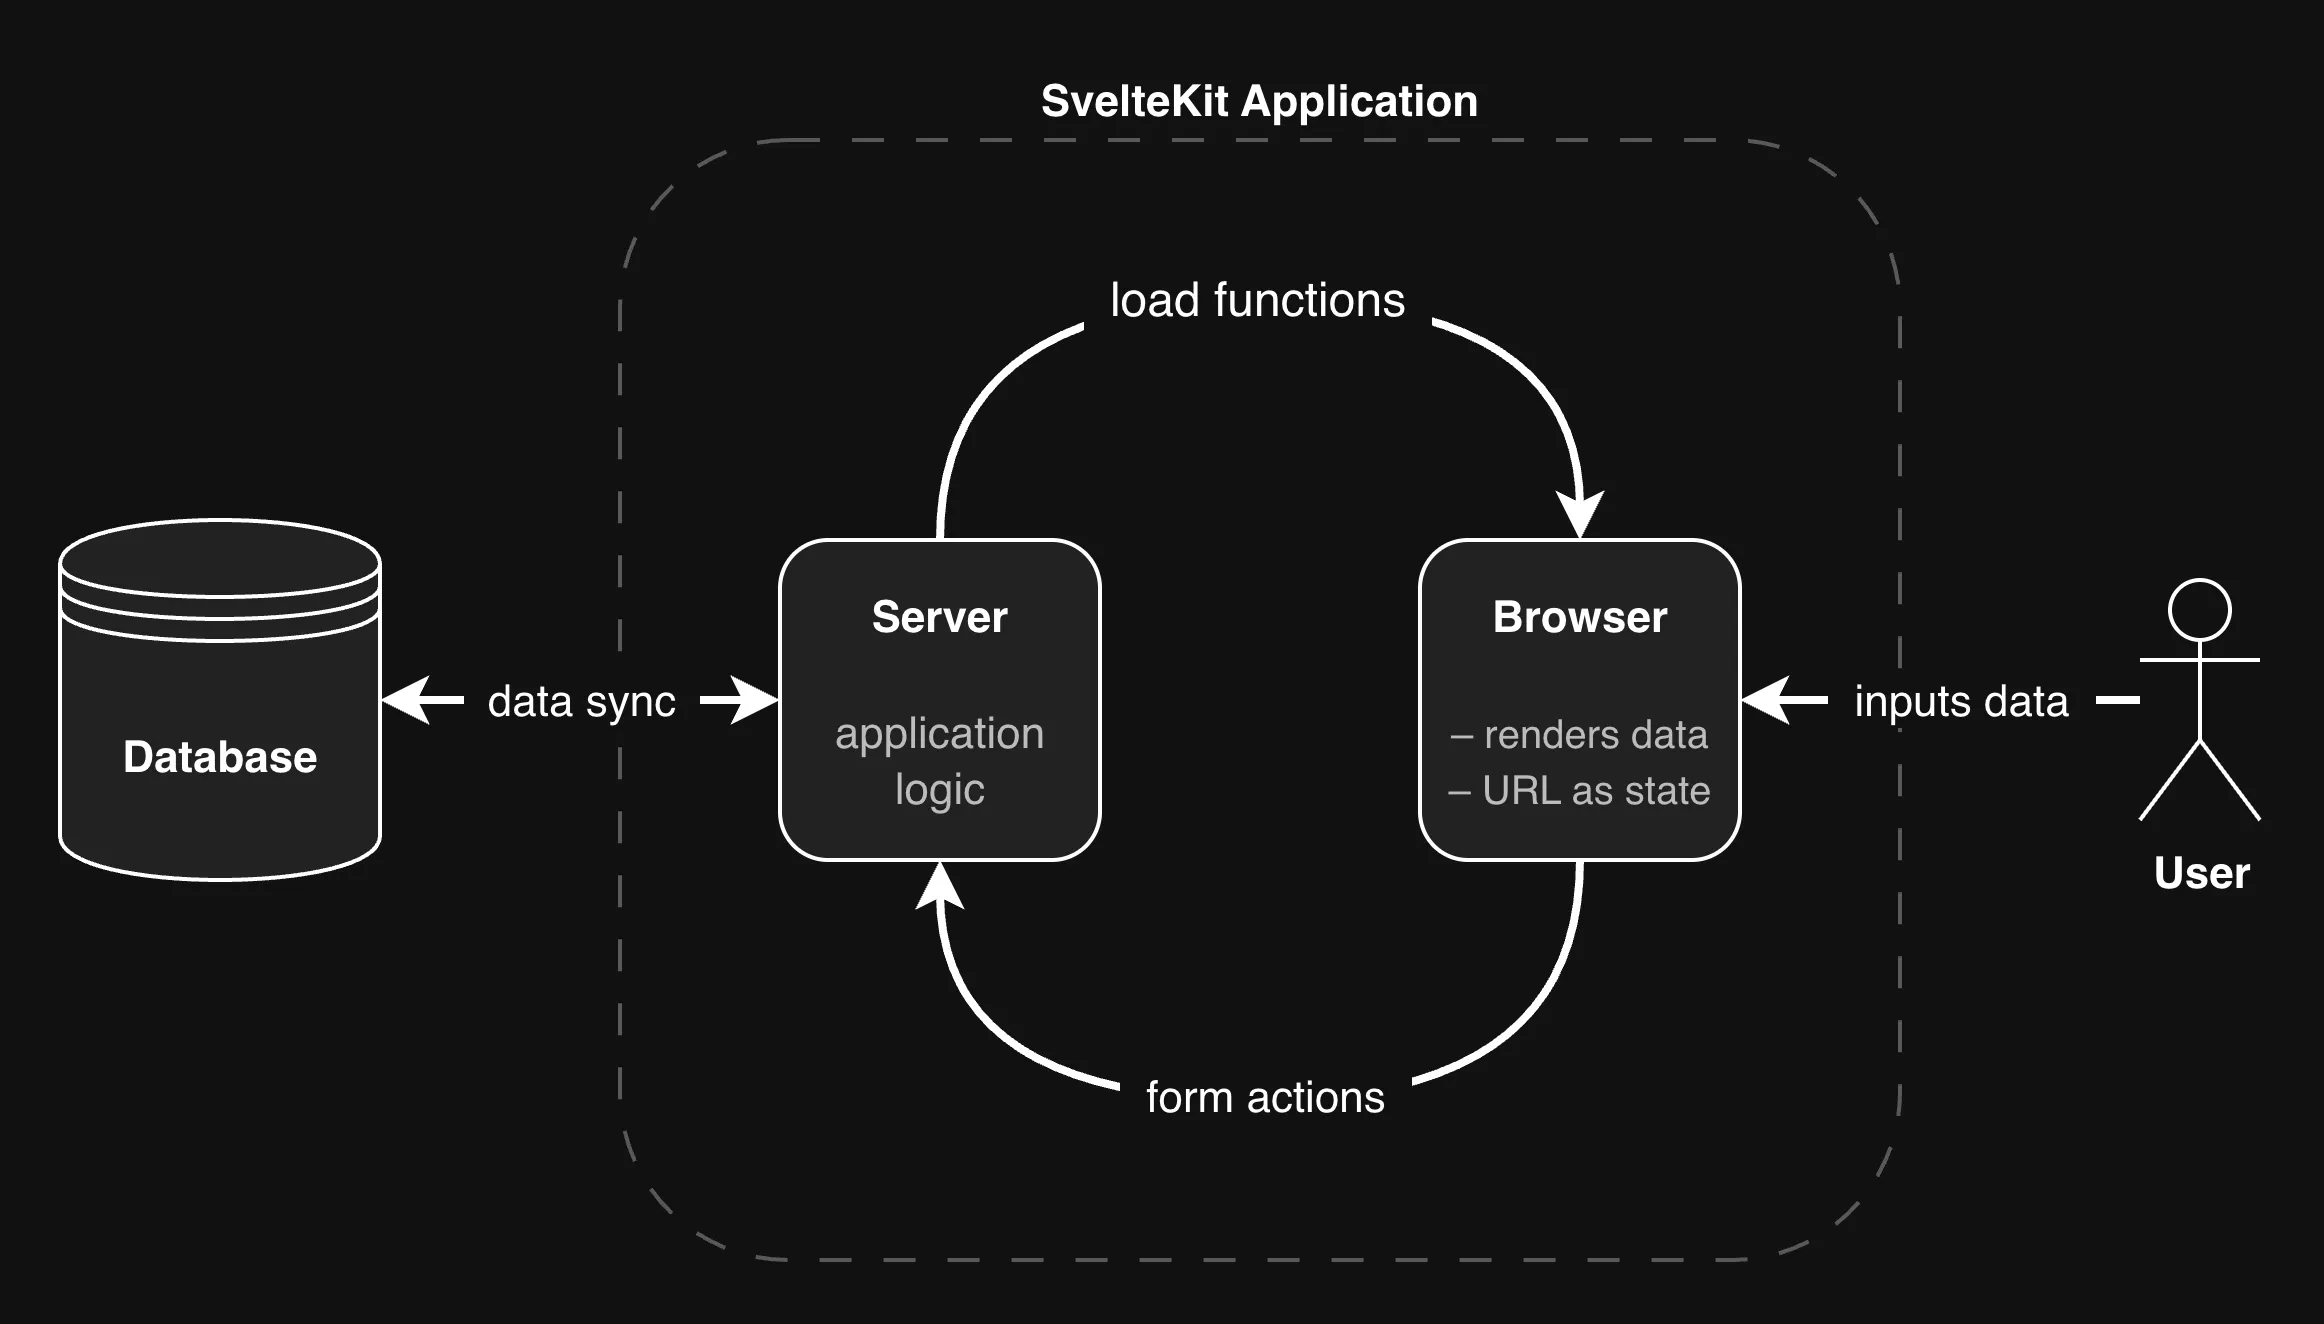
All of this requires zero JavaScript in the browser. The application logic happens entirely on the server (using JavaScript or TypeScript). This has several advantages:
- The application works more reliably under unstable network conditions.
- It works even if users disable JavaScript (for example, for privacy reasons).
- It reinforces a robust architectural principle: the server handles application logic, the browser renders the result.
- In many cases, the overall code becomes simpler.
This principle is not new, but it has been overshadowed somewhat by the rise of SPAs and JavaScript frameworks.
SvelteKit also supports progressive enhancement for form actions and navigation, which improves the user experience when JavaScript is available.
This post is aimed at developers who want to understand what SvelteKit is capable of in the context of a concrete application. If you are already experienced with SvelteKit, much of this may be familiar (with the possible exception of the section on renaming tasks).
Note that this article is based on SvelteKit 2.0, while SvelteKit 3.0 is already around the corner.
Setup
Start by creating a new SvelteKit project:
npx sv create
Follow the prompts. In this example, I have chosen TypeScript. If you prefer JavaScript, you can ignore the type annotations in the code below.
Next, clear the contents of routes/+page.svelte and add a simple heading:
<h1>Manage Tasks</h1>
This application consists of a single page. Whenever "page" is mentioned, it refers to this file.
Start the development server with pnpm dev (or npm run dev, etc.). Open http://localhost:5173 in your browser to see the page.
Tasks on the Server
We will start by defining what a task looks like. Inside the lib folder, create a new file types.ts and add a type that models a task:
// lib/types.ts

export type Task = {
	id: string
	title: string
	done: boolean
}
Next, create a file lib/server/tasks.ts. The /server subfolder ensures that everything in this file runs exclusively on the server.
For this demo, tasks are stored in memory instead of a database. A simple Map acts as a small in-memory data store:
// lib/server/tasks.ts

import type { Task } from '$lib/types'
import crypto from 'node:crypto'

// maps: task_id ---> task
const tasks: Map<string, Task> = new Map()

// optional sample task
tasks.set('1', { id: '1', title: 'Write code', done: true })
Now add two functions: one to return all tasks and one to create a new task.
// tasks.ts

export async function get_tasks() {
	const all_tasks = [...tasks.values()]
	return all_tasks
}

export async function create_task(title: string) {
	const id = crypto.randomUUID()
	const task: Task = { id, title, done: false }
	tasks.set(id, task)
	return task
}
Both functions are marked as async to resemble real database calls. For development, you can also add an artificial delay to simulate latency.
Loading Tasks
To read tasks from the server and render them, we need a load function. Create a file routes/+page.server.ts and add:
// +page.server.ts

export const load = async (event) => {
	const tasks = await get_tasks(filter)

	return { tasks }
}
You will need to import get_tasks, but the obvious imports are omitted for brevity.
On the page, the data returned from load is available as data in the page props. For now, we can simply render it as JSON:
<!-- +page.svelte -->

<script lang="ts">
	let { data } = $props()
</script>

<!-- "console log" to the browser: -->
<pre>{JSON.stringify(data.tasks, null, 4)}</pre>
This works without any client-side JavaScript. Even though there is a <script> tag, SvelteKit renders the page on the server by default (SSR). You can verify this by adding
console.log('hi mom!')
in the <script> tag. The message appears both in the terminal (server) and in the browser console (client). You can also inspect the network tab and check the HTML response: the rendered tasks are already part of the document.
At this point, we have covered the R in CRUD.
Rendering raw JSON is not ideal, so let's display the tasks properly. We can loop over them and render a Task.svelte component for each entry:
<!-- +page.svelte -->

<section>
	<h2>List of Tasks</h2>

	{#each data.tasks as task (task.id)}
		<Task {task} />
	{:else}
		<p>No tasks yet</p>
	{/each}
</section>
Now create lib/components/Task.svelte:
<!-- Task.svelte -->

<script lang="ts">
	import type { Task } from '$lib/types'
	let { task }: { task: Task } = $props()
</script>

<div class="task">
	<h3>{task.title}</h3>

	{#if task.done}
		Done
	{:else}
		Not done
	{/if}
</div>

<style>
	.task {
		/* ... your style ... */
	}
</style>
The component is intentionally simple for now. It receives a task as a prop and renders its title and status.
Creating Tasks
Let's move on to the C in CRUD: creating tasks.
To create a new task, add a form to +page.svelte that sends a POST request:
<!-- +page.svelte -->

<section>
	<h2>Create Task</h2>

	<form action="?/create" method="POST">
		<input type="text" name="title" aria-label="task title" required />
		<button>Create</button>
	</form>
</section>
The attribute action="?/create" ensures that the request is not only sent to /, but to /?/create, the home page with the query parameter /create. Since we will have multiple forms on this page, each form needs its own action name so it can be handled separately on the server.
Notice what we are not doing:
- No
onclickhandler on the button - No
onsubmithandler on the form - No
e.preventDefault()for the submit evente
This is common in SPAs, but here we rely entirely on the platform. A button inside a form has type="submit" by default and submits the form to the URL defined in action. This is plain HTML behavior and requires no client-side JavaScript.
To handle the request, create a form action in +page.server.ts named create as follows:
// +page.server.ts

export const actions = {
	create: async (event) => {
		console.info('hi from the server!')
		// ...
	},
}
Trigger the form to test it. The URL path changes from / to /?create, and the message is logged on the server, not in the browser. This means we can safely interact with our (fake) database without exposing anything to the client.
Next, extract the form data from the request, and create the task:
const form = await event.request.formData()
const title = form.get('title') as string

await create_task(title)
In a real application, you would validate the title (non-empty, reasonable length, etc.), but we will skip that here.
The nice part is that you don't have to manually trigger any update in the browser: Once the action completes, SvelteKit automatically runs the corresponding load function again. There, we read the updated list of tasks from our in-memory store. SvelteKit then renders the updated page on the server and sends it to the browser. In particular, the new task appears.
Progressive Enhancement
Creating a new task works, but there are a few UX issues:
- The URL changes.
- The browser shows a navigation.
- There may be a brief flash before the updated page appears.
- The process can feel slow.
- Transitions for new tasks don't run (if defined).
SvelteKit provides a built-in way to progressively enhance forms, which fixes all of these issues, but it does require JavaScript in the browser. Simply import the function:
import { enhance } from '$app/forms'
Then attach it to your form:
<!-- +page.svelte -->

<form action="?/create" method="POST" use:enhance>
	<!-- ... -->
</form>
If JavaScript is disabled, the form still works exactly as before, so it's safe to add. But for the rest of this post, I won't use enhance because the goal is to show what's possible without any client-side JavaScript.
A Well-Formed Approach
Now that creating tasks works, let's look at editing them, in particular how to delete tasks. With client-side JavaScript, you might do something like this in Task.svelte:
<button onclick={delete_task}>Delete</button>
Then define a delete_task function that calls the server (e.g., via an API) and updates the list of tasks in the browser when successful. Svelte would rerender the list.
However, we take a different approach that requires no client-side JavaScript: We wrap the button in a form and handle the request with a form action called delete.
In fact, we can do more: make each task a small interactive form. Each button can point to a different action using the formaction attribute (see below). After submission, SvelteKit reloads the page, so the deleted task disappears automatically.
The takeaway: whenever a user can edit part of a page, make that part a form. It's simple, works in almost all cases, and keeps the logic on the server. This approach isn't new at all, but it has been somewhat overshadowed by modern JavaScript frameworks.
Bonus: forms improve accessibility. Pressing Enter while focused on an input will automatically submit the form.
Deleting Tasks
To delete a task, we make the whole task element a form and place a delete button inside. The form's action can remain empty, while the button specifies the action using the formaction attribute:
<!-- Task.svelte -->

<form method="POST" class="task">
	<h3>{task.title}</h3>

	<button formaction="?/delete">Delete</button>

	<!-- ... -->
</form>
It's still a good idea to add use:enhance for progressive enhancement.
But there is a problem: How does SvelteKit know which task to delete? All tasks use the same endpoint. The solution is to add a hidden input field with the task ID.
<form method="POST" class="task">
	<!-- send the task ID -->
	<input type="hidden" name="id" value={task.id} />

	<h3>{task.title}</h3>

	<button formaction="?/delete">Delete</button>

	<!-- ... -->
</form>
On the server side, define the delete action and read the task ID from the form:
// +page.server.ts

export const actions = {
	// ...
	delete: async (event) => {
		const form = await event.request.formData()
		const task_id = form.get('id') as string
		await delete_task(task_id)
	},
}
Implementing the delete_task function is straightforward:
// tasks.ts

export async function delete_task(id: string) {
	tasks.delete(id)
}
After submission, SvelteKit reloads the page, so the deleted task disappears automatically. This completes the D in CRUD.
Alternative Approach
Instead of inline forms, you could create a separate page for editing a task at /tasks/[task_id] using a dynamic route. The Task component would link to this page, and the task ID could be retrieved from event.params.task_id on the server. This works well for complex objects with many fields, but for a simple task it is overkill. Also, it forces the user to switch contexts.
Marking Tasks as Done
Toggling the done status of a task follows the same approach. Add a button with the appropriate formaction. The text changes depending on the current status (in the finished app, I have replaced these with icons):
<!-- Task.svelte -->

<button formaction="?/toggle_done">
	{#if task.done}
		Mark as undone
	{:else}
		Mark as done
	{/if}
</button>
The {#if} ... {/if} block is a Svelte rendering directive, not a client-side if. This is why it works with zero JavaScript in the browser.
The form action handles the logic:
// +page.server.ts
export const actions = {
	// ...

	toggle_done: async (event) => {
		const form = await event.request.formData()
		const task_id = form.get('id') as string
		await toggle_task_done(task_id)
	},
}

// tasks.ts
export async function toggle_task_done(id: string) {
	const task = tasks.get(id)
	if (!task) return
	task.done = !task.done
	return task
}
You can also style tasks based on their done status:
<!-- Task.svelte -->

<form method="POST" class="task" class:done={task.done}>
	<!-- ... -->
</form>

<style>
	.task.done {
		/* your style */
	}
</style>
If you want to animate changes of the done status (for example, a background color transition), you need to add use:enhance. Otherwise, SvelteKit sends a full new page, and transitions are lost.
This covers the U in CRUD, completing all four operations. Full updates, like renaming tasks, are covered in a later section.
Filtering Tasks
We have already seen how the URL can save the state which form action is being triggered. We can also use it to save the filter which tasks are displayed (all / done / undone). Instead of creating client-side state, we let the URL determine what to show.
For example:
/?filter=done→ only done tasks/?filter=undone→ only undone tasks/?filter=allor/→ all tasks
First, update the get_tasks function to accept a filter:
// tasks.ts

export async function get_tasks(filter: string) {
	const all_tasks = [...tasks.values()]
	if (filter === 'done') {
		return all_tasks.filter((task) => task.done)
	}
	if (filter === 'undone') {
		return all_tasks.filter((task) => !task.done)
	}
	return all_tasks
}
In a real SQL database, this would translate to a WHERE done = ... clause.
Next, adjust the load function to read the filter from the URL:
// +page.server.ts

function get_filter(url: URL) {
	const filter = url.searchParams.get('filter')
	if (filter === 'done' || filter === 'undone') return filter
	return 'all'
}

export const load = async (event) => {
	const filter = get_filter(event.url)
	const tasks = await get_tasks(filter)
	return { tasks, filter }
}
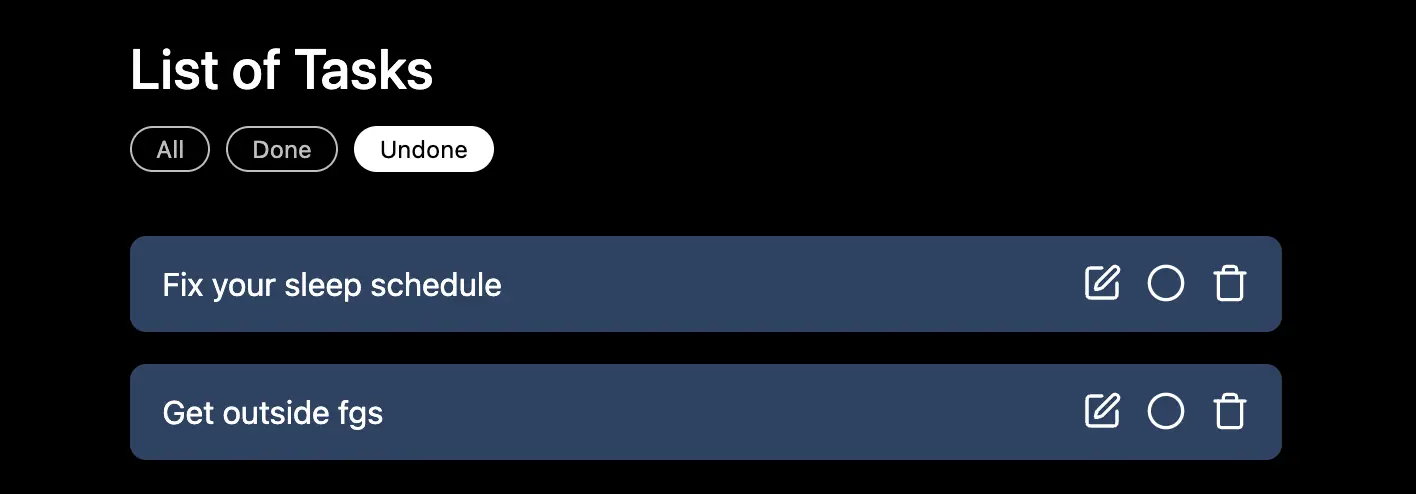
Visiting /?filter=done now shows only done tasks.
To let users choose a filter, we simply add corresponding links. They can be styled as buttons or tags:
<nav aria-label="Task filter">
	<a href="/" aria-current={filter === 'all'}>All</a>
	<a href="/?filter=done" aria-current={filter === 'done'}>Done</a>
	<a href="/?filter=undone" aria-current={filter === 'undone'}>Undone</a>
</nav>
The aria-current attribute signals to screen readers which filter is active. You can style it accordingly:
<style>
	a[aria-current='true'] {
		/* your style */
	}
</style>
This method is more accessible than a .active class since it conveys meaning.
Again, no client-side JavaScript is needed. The URL alone manages the filter state. If JavaScript is available, SvelteKit uses client-side navigation by default, making the switch between filters look seemless and instant.
Renaming Tasks
To rename a task, a simple approach is to replace the task title <h3>{task.title}</h3> with an input field and a rename button. But showing the input all the time feels cluttered. Constantly displaying input fields increases visual noise and distracts from the main purpose of quickly scanning tasks.
A better UX is to display the input only when the user decides to rename the task. This idea scales well: in the same section, you could add other task options (archive, share, schedule, etc.) without cluttering the main task list.
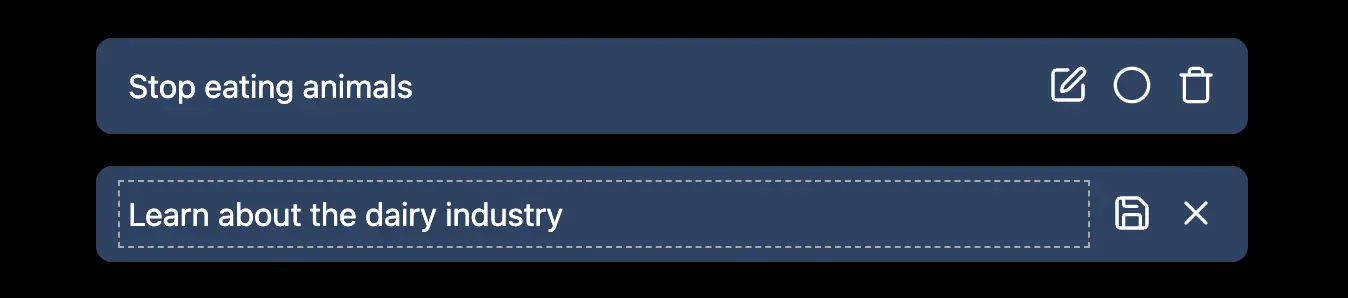
We can implement this without any client-side JavaScript by using the URL as a state management device. The URL /?rename={task_id} indicates that a particular task is in rename mode. Clicking a link to that URL enters the state. In this state:
- Other task elements are hidden
- The task title is replaced with an input field
- Two actions are available: save (form action) and cancel (link that reverts the URL)
In Task.svelte, import the page state from $app/state to read the URL and update the component:
<!-- Task.svelte -->

<!-- detects if the url has ?rename={task.id} -->
{#if page.url.searchParams.get('rename') === task.id}
	<input
		type="text"
		aria-label="title"
		name="title"
		value={task.title}
		required
	/>
	<div>
		<button formaction="?/rename">Save</button>
		<a href="/">Cancel</a>
	</div>
{:else}
	<!-- ...previous elements... -->

	<a href="/?rename={task.id}">Rename</a>
{/if}
On the server, define the rename action:
// +page.server.ts
export const actions = {
	// ...
	rename: async (event) => {
		const form = await event.request.formData()
		const task_id = form.get('id') as string
		const new_title = form.get('title') as string

		await rename_task(task_id, new_title)
	},
}

// tasks.ts
export async function rename_task(id: string, new_title: string) {
	const task = tasks.get(id)
	if (!task) return
	task.title = new_title
	return task
}
After submitting, the page reloads, showing the updated title. The URL no longer has the rename parameter (it has the /rename parameter from the action instead), so the task returns to its normal display.
Conclusion
In this post, we built a fully functional task management application in SvelteKit without relying on any client-side JavaScript. We explored how to handle all CRUD operations (creating, reading, updating, and deleting tasks) entirely on the server using form actions and load functions. We have used the URL to store which task is in rename mode.
The same method can be used for more complex applications as well. In fact, I use this mental model all the time. By the way, my repository sveltekit-forms explores similar ideas.
If you enjoyed this post, share it with other developers online or leave a comment below.